SQL Service


The Syncloop SQL service provides a powerful tool for connecting with various databases and performing database operations such as creating database objects (tables, views, synonyms, indexes, etc.) and manipulating data (reading and writing).
This documentation will guide you through the process of using the Syncloop SQL service to interact with databases and integrate them with your application or client.
Getting Started
To use the Syncloop SQL service effectively, you need to follow three simple steps:
Creating a JDBC Connection
Creating an SQL Service
Invoking the SQL Service from an API
Creating a JDBC Connection
The JDBC (Java Database Connectivity) connection allows Java clients to interact with databases.
Follow these steps to create a JDBC connection in the Syncloop API Development Platform:
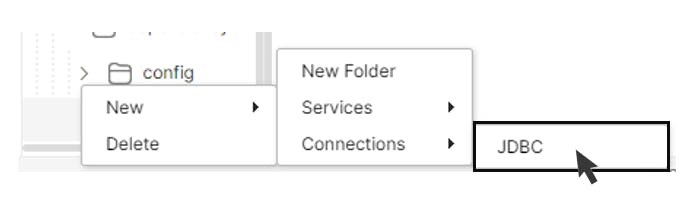
Right-click on the package folder and select "New" ➜ "Connections" ➜ "JDBC" to open the JDBC dialog.
Enter a name for the JDBC connection and click "OK."
Click on the created connection in the Package Explorer. This will open an editor and display the four connection variables: driver, URL, username, and password.
Populate the connection object by providing the required values for the variables:
Driver class: The driver class for the specific database you want to access.
Connection URL: The JDBC connection URL, which includes the database name, server name (default is localhost), and port number.
Username: The username for the database. For MySQL, the default username is "root."
Password: The password associated with the database. For MySQL, the default password is "root."
Save the connection file.
Note: Detailed information regarding JDBC connections for various databases is available in the table provided.
| Database | Driver Name | Database URL |
| MySQL | com.mysql.jdbc.Driver | jdbc:mysql://<server>:<port>/<databaseName> |
| Oracle | oracle.jdbc.driver.OracleDriver | jdbc:oracle:thin:@<server>:<port>:<databaseName> |
| IBM DB2 App | com.ibm.db2.jdbc.app.DB2Driver | jdbc:db2:<databaseName> |
| IBM DB2 Net | com.ibm.db2.jdbc.net.DB2Driver | jdbc:db2//<server>:<port>/<databasebName> |
| Sybase | com.sybase.jdbc.SybDriver | jdbc:sybase:Tds:<server>:<port>/<databaseName> |
| Teradata | com.teradata.jdbc.TeraDriver | jdbc:teradata://<server>/database=<databaseName>,tmode=ANSI,charset=UTF8 |
| Microsoft SQL Server | com.microsoft.sqlserver.jdbc.SQLServerDriver | jdbc:sqlserver://<server>:<port>;databaseName=<databaseName> |
| Postgre | org.postgresql.Driver | jdbc:postgresql://<server>:<port>/<databaseName> |
| MS Access (JDBC-ODBC Bridge) | sun.jdbc.odbc.JdbcOdbcDriver | jdbc:odbc:Driver={Microsoft Access Driver (*.mdb)};DBQ=<myDBName.mdb>; |
Note: Replace <server>, <port>, and <databaseName> with the actual values specific to your database configuration.
Please ensure that you have the corresponding database driver available and properly configured in your project or environment.
To upload additional drivers into the Syncloop API Development Platform, follow these steps:
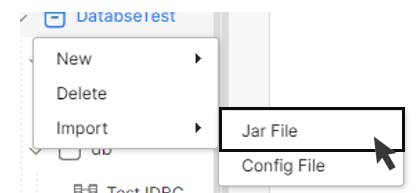
Right-click on the Package file to open the context menu.
Select "Import" ➜ "Jar File."
Choose the Jar file containing the driver from your computer and upload it.
A new folder named "jars" will be created, and the driver file will be stored there.
Note: By default, Syncloop provides two preloaded database drivers for MySQL and SQL Lite.
Creating an SQL Service
Once you have successfully created a JDBC connection, proceed to register the connection and specify the queries to access the backend database.
The query can be of different types, such as
Data Definition Language (DDL),
Data Manipulation Language (DML),
Data Control Language (DCL
Transaction Control Language (TCL).
Follow these steps:
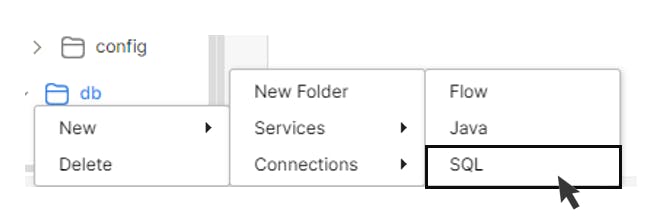
Click on the Package Folder in the Syncloop API Development Platform.
From the context menu, select "New" ➜ "Services" ➜ "SQL" to open the SQL Service dialog.
Enter a name for the SQL service in the "SQL Name" field and specify the consumer and developer groups. Click "OK" to confirm.
Click on the created service and specify the SQL command.
Save the file.
The default input/output parameters for the SQL service are as follows:
inputDocList: This parameter is used to specify the payload. All input variables carrying data should be specified under the inputDocList.
txConn: It represents the connection object.
isTxn: If set to true, the txnConnection can be used.
error: This parameter stores error information related to the SQL service.
Transaction Isolation Levels: Transaction isolation levels define the degree to which a transaction must be isolated from data modifications made by other transactions in the database system.

The following levels are available:
Read Uncommitted: The lowest isolation level, allowing a transaction to read uncommitted changes made by other transactions. Dirty reads are possible at this level, as transactions are not isolated from each other.
Read Committed: This level guarantees that any data read is committed at the moment it is read. It prevents dirty reads and holds a read or writes lock on the current row, preventing other transactions from reading, updating, or deleting it.
Repeatable Read: Transactions at this level hold read locks on all rows they reference and write locks on referenced rows for update and delete actions. It prevents non-repeatable reads since other transactions cannot read, update, or delete these rows.
Serializable: The highest isolation level, where concurrently executing transactions appear to be serially executing.
Invoking the SQL Service from an API
The API is created to call the previously created SQL service and access the database. This service allows for mapping various input and output parameters.
Conclusion
The Syncloop SQL service offers a convenient way to connect with databases, create database objects, and manipulate data. By following the outlined steps in this documentation, you can effectively integrate the Syncloop SQL service into your application or client and unleash its full potential.